1.21.2011

House Crashing: The Aftermath

So I lied about having the photos up yesterday....I apologize.  Work has been crazy and I just didn't have a chance to upload the photos to my computer.  But fear not, I got around to it last night and can't wait to share them with you.  For those of you just joining in, here's a quick recap: B and I flew out to Chicago this past weekend to help our friends with their bathroom and kitchen DIY projects.  The bathroom was a full demo (everything but the bathtub), but the kitchen was just a small update (adding a backsplash).  You can read more about the trip here and here

So here is where we started last week:

Bathroom


Kitchen


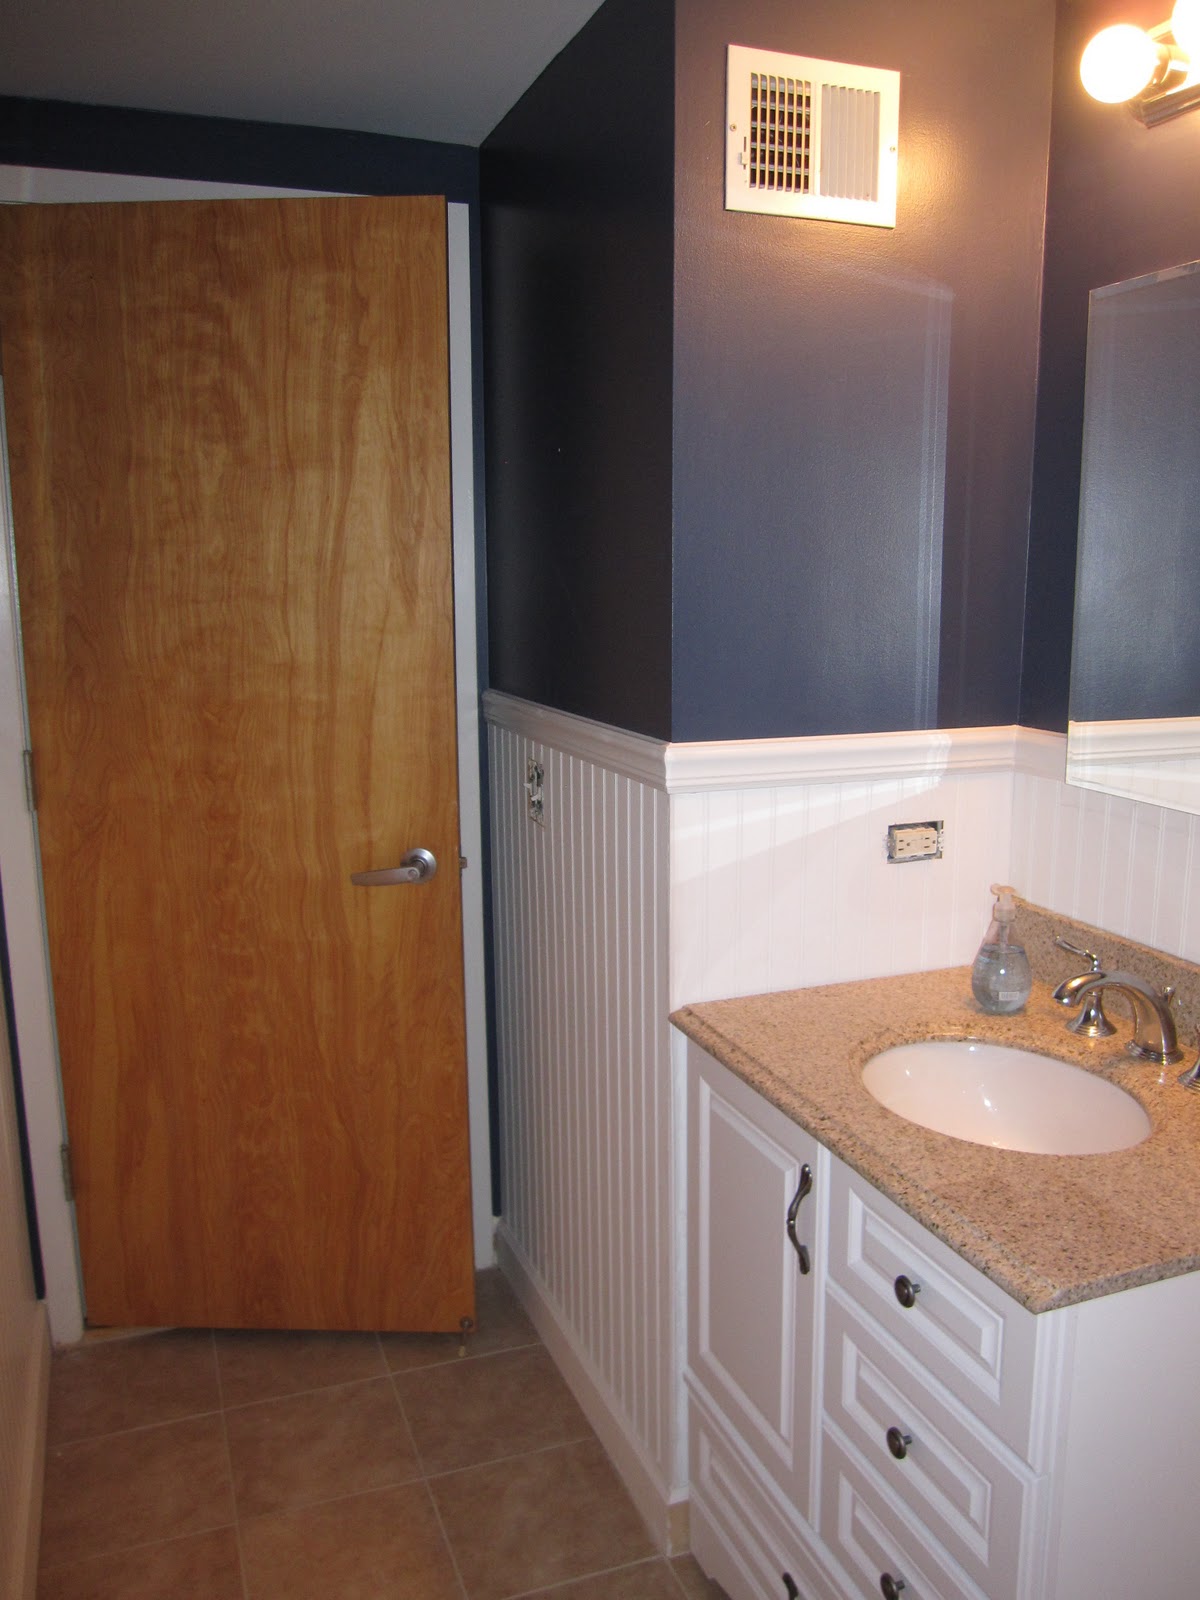
Neither room started off that badly.  Trust me, I've seen a lot worse in my own house.....actually, I'm not sure I've even shown you guys my upstairs bathroom......well, there's definitely a reason for that.  Back to their house though, we weren't dealing with a total disaster here, they were just looking to update the bathroom with a new and more functional vanity, wainscotting along the walls, a new tile floor, a medicine cabinet in front of the vanity rather than on the wall behind it (as seen in the first photo shown earlier), and to patch the hole from the existing medicine cabinet.  They also purchased new hardware to tie everything together.  As far as the kitchen went, it was already updated with stainless steel and nice cherry cabinets, but they were looking for something more.  And a backsplash was just the solution.  We checked out a lot of different tiles and ended up going with a glass tile mosaic.  I had never worked with that before, so it was a first for both of us.  For all of my DIY tile projects (read more about them here, here and here) I used thinset and mixed my own grout, but since we were dealing with such a small space here, we decided to try a simplemat tile setting mat (see below).  I have read about them in numerous DIY blogs over the years but never tried it myself...until now.


And I have to say that it was DEFINITELY a lot faster and cleaner than using thinset mortar.  No mess to clean up after and you don't have to wait to grout.  The only downside was that it is VERY sticky so you have to be careful that you lay the 12x12 mosaic sheets (or whatever tile you are using) right the first time or it is a pain to try to peel back off and re-lay it.  Overall though, I would highly recommend the product though for a quick and easy DIY project.  We were honestly done laying the tile in about 40 minutes. 

Here are a few photos during the tiling process:


LP picked up the tiling process really quickly, so she ended up doing most of it while I just "supervised."  She did a great job!!  12x12 mosaic sheets are so easy to use too that it made the whole process that much easier.  If we needed to cut around an outlet or corner, we could usually just cut the mesh backing as needed and continue on our merry way.  We actually only needed to cut (with a wet saw) 5-6 individual tiles around the edges of the outlet.  We really lucked out with the spacing!  And speaking of spacing, the 12x12 sheets are also great because they come on the mesh backing already spaced, so you don't need individual spacers for this project.  Another step eliminated!!! 

The last step, and probably the most tiresome was the grouting.  With the way the schedule fell this weekend, we didn't have time to do the grouting before we left, so LP tackled this on her own Tuesday and Wednesday.  It was tedious but it came out really nice.  Here is the final before and after:


All in all, this was a really simple update that made a big impact on the look and feel of the kitchen.  It seems a lot more finished now, don't you think???

Well, now I guess I should get on with the big renovation of the weekend.  You are probably holding your breaths waiting for this reveal, so without further ado.....here are some shots taken throughout the weekend so you can see the progress.....

Here, you can see here that the floor and the mirrors/medicine cabinet has been removed and we have started patching the holes and putting up the wainscotting.....
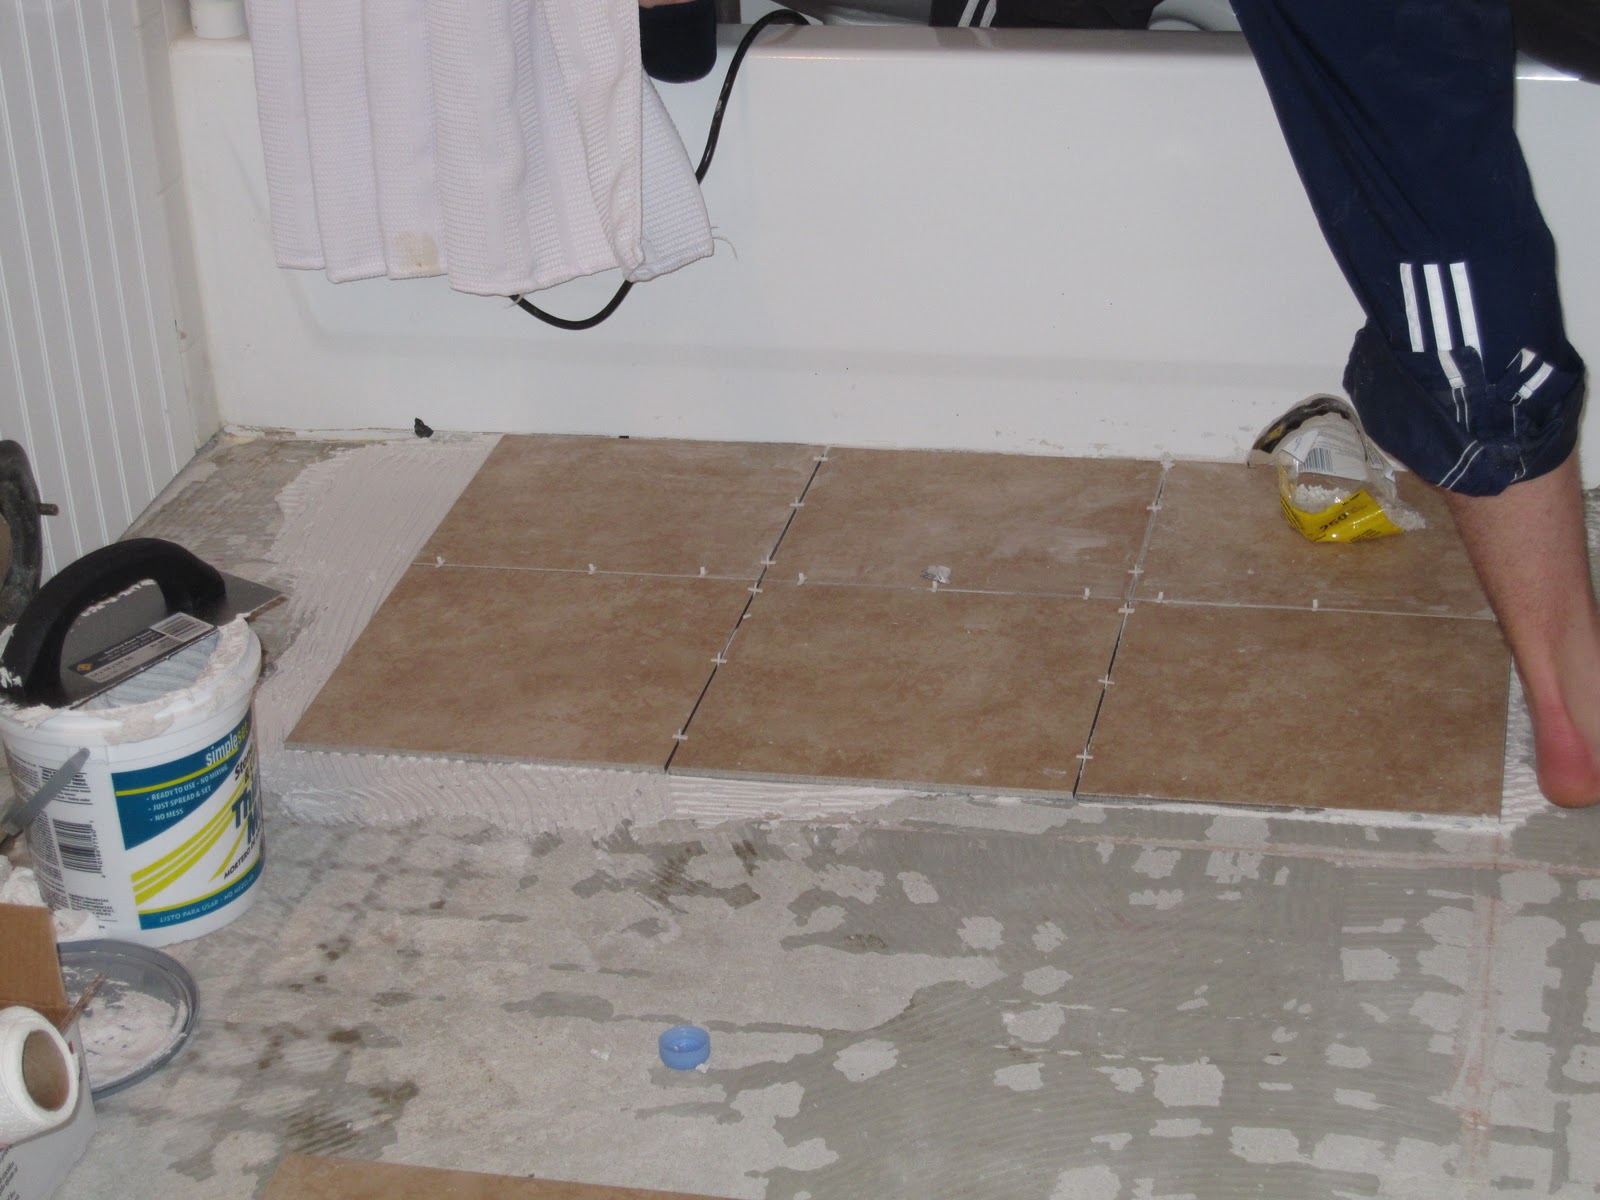
We laid out all of the tiles first to see what the best configuration was (i.e., least amount of tile cuts)
and then started laying from the tub back out.  This is important so you don't tile yourself into the
tub/corner of the room!!!

Before grouting, we were able to put up the rest of the wainscotting around the room.  Next, we grouted the floor and wiped off all the excess once it had dried a little.  The final steps after that were just to install the rest of the molding and the fixtures.  As you may be able to see in the pictures, the toilet was hanging out in the tub until we could re-install it.  That made it so we didn't have to carry it all the way outside (since we were working in a condo unit).  The vanity was new, so we just had to anchor that into the wall and then attach the granite top to it using some silicone caulking.  We purchased the granite top with the sink already undermounted to it, so that saved us a step as well.  I highly recommend this to anyone considering a DIY bathroom renovation in the future!!  And finally, we did all of the finish work (filling in holes with wood filler or paintable DAP caulking, installing the faucet and other fixtures and painting the wainscotting and touch-up areas on the blue wall. VOILA!!!

Here is the before and after:


So there it is folks.  It doesn't seem that a dramatic update in these photos for some reason, but it made a world of different in their bathroom.  Not only is it more functional with the new vanity and the re-placement of the medicine cabinet, but it is also a lot brighter and cleaner looking than it was before.  The small white tiles on the floor were dirty and cracking, not to mention outdated, so the larger 12" tiles really helped to clean it up and make it more finished. 

And I know what you are thinking.....do I only use blue paint and white wainscotting in bathrooms...haha!  They actually already had the blue paint (Benjamin Moore - Newburyport Blue) on their walls before we started this project and they just happened to want the white wainscotting as well.  Maybe its a New England thing (since they are from here)......who knows?  What do you think of the transformation??  Have you renovated your bathroom recently?  I would love to hear about it!! 

1.19.2011

House Crashing Update

We are back from Chicago and slowly recovering from all the work, excitement and craziness of our travelling renovation weekend.  We are definitely tired (mostly from the 5+ hours we spent waiting in the airport/on the plane for our delayed flight to take off last night....thank you New England weather) but we had an absolute blast!  From the 15 trips to Home Depot to the midnight sprints down the hall to a spare condo unit to use the bathroom (since we removed the toilet on Friday night and didn't re-install it until Monday night...YIKES)....there were no dull moments to be had.  And we honestly couldn't have asked for a better couple to spend it with either.  B and his friend T were roommates back in college (and long after college ended) and have been close ever since.  And LP is his trusty wife/sidekick who happens to moonlight as a doctor when she's not renovating her condo!!  They are an amazing couple and the absolute most deserving of this little weekend makeover!

I haven't uploaded all of the during and after photos yet, but here's a little peek at the before photos to whet your appetite......


BATHROOM


KITCHEN


I'll be back tomorrow with more on the renovation weekend, including all of the after photos!!  Stay tuned....

Also this week, I will be doing a full post on our own kitchen renovation, mudroom and all.  I realized that I did a lot of peicemeal posts about it as I went, so I thought I would do a REAL before and after post on the big kitchen renovation.  YAY!!

1.14.2011

Renovation Weekend

Later ya'll!  <-- I don't actually have that accent, but it would be fun if I did. 

We are headed to Chicago this weekend to renovate our friends' bathroom (and possibly add a backsplash in their kitchen as well).  I am so excited to help them with this makeover and can't wait to show you the results!!!  I will take lots of pictures and be back on Tuesday (maybe Wednesday if we get the snow they are talking about) to share it all with you.

Wish us luck and have a great weekend!!

1.11.2011

Mudroom Update

A few weeks ago, during a typical messy-house-tantrum, I decided that I wanted a more organized mudroom area in our kitchen.  When we renovated the kitchen, our initial plan was to have a bench seat with a painting or something graphic above it and perhaps a table with a little chandy for eat-in breakfasts with future kids.....but after a few months of use, I realized that it needed to be more functional than that.  You live and learn, folks, SERIOUSLY!  If I can impart one piece of knowledge to you DIYers out there, I would have to say that you should definitely live in a space long enough to know how you use it before making any big renovation decisions.  For us, most of our renovation just happened to work out perfectly, but a few things definitely had to be re-done after we realized how we would function in the house.  Por ejemplo.......our mudroom/pantry area......


This is what we were dealing with when we moved in.  The previous owners seemed to use it as an extra little sitting area, maybe even a den.  To be honest, I do like the idea of having a warm and welcoming place for guests to be greeted in a home (maybe not on a shag sofa, specifically), but in a more updated and functional way. 

So, our first order of business was to tie in the space with the rest of the kitchen.  We did this by adding some pantry storage (with cabinet doors matching the existing pine cabinets that we painted in the kitchen) and a bench to store shoes, coats, cleaning supplies and lots and lots of canned goods and toilet paper.  (Side note: I love Costco!!) 

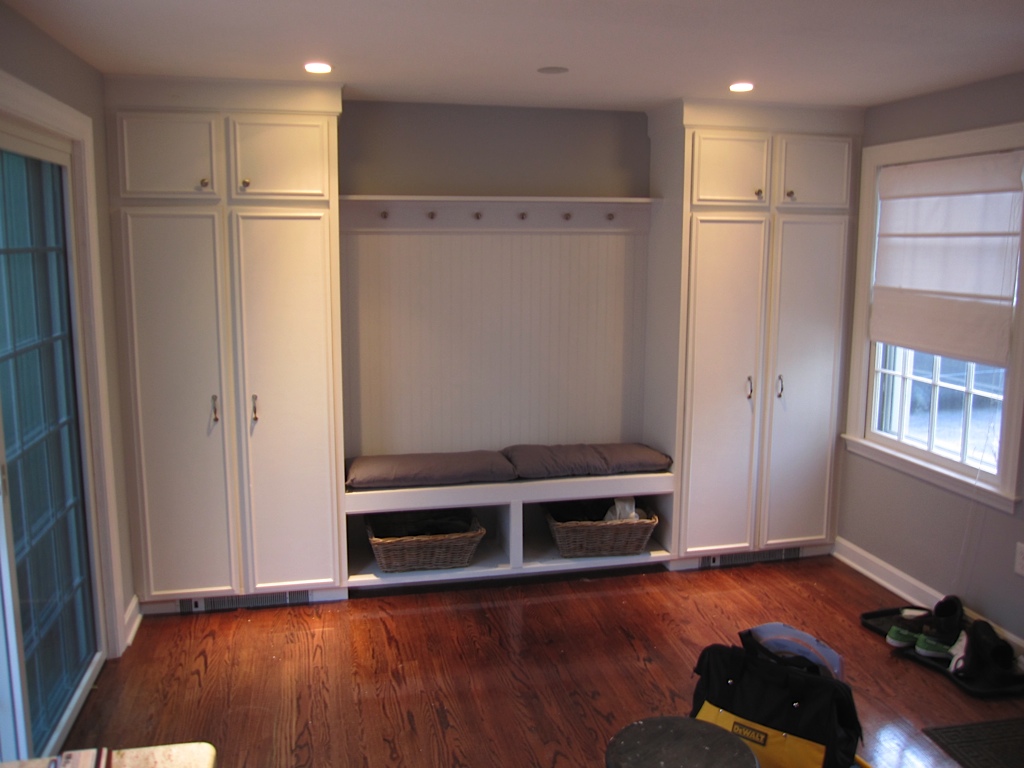
Here she is after phase 1 of the kitchen re-design:


But after a few months of living in the space we realized that we needed something more. 

So B and I ventured out to HD for some materials:

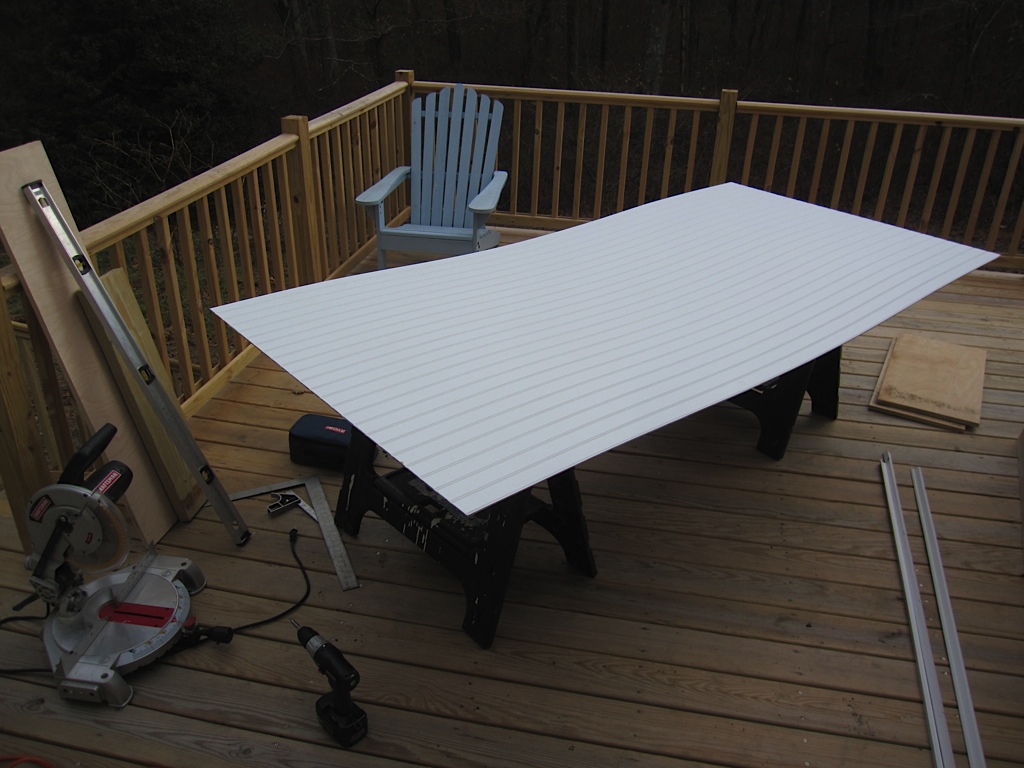
(1) sheet of 4' x 8' MDF beadboard (wainscotting)
(2) 5' piece of molding (of your choosing)....we went with quarter-round
(1) 1"x5" piece of pine cut to 5' to attach the hooks
(1) 1"x5" piece of pine cut to 5' to use as a shelf
(6) hooks for hanging coats

I think the total for everything was about $30 or so, maybe even less.

The first order of business was to put up the wainscotting. 


Luckily we have the deck right outside the slider doors now,
so we can set up our table saw for cutting when we do projects like this!!

We just used a little bit of Liquid Nails along the back of the wainscotting,
then pressed it into place on the wall

We added some small finish nails to the top
(which would be hidden by the shelf anyway) to add a little more security

Our next step was to add the facing piece/piece that would hold up the shelf.  Since I chose to use door knobs for the hooks, we had to screw them on before we nailed the piece to the wall.  In retrospect, it was not the smartest choice, since we cannot remove them short of ripping down the whole piece, but I doubt I will ever need to change them out anyway!!  So, if you are planning to do something like this, you are probably better off finding the screw-in hooks.  But its up to you!!

I don't have a picture from that step, but here it is all put together:


After the facing piece was installed, we simply added a piece of quarter round molding to the bottom of the pine board (to add a little dimension and make it look more custom).  Next, we installed the shelf, which is secured on both sides through the inside of the cabinet (for extra support).  And finally, we added another piece of more decorative quarter round underneath the shelf to add a little extra support and make it look more like one big piece of molding. 

The final step was to paint everything white.  Since the wainscotting is already pre-primed, we just did 2 coats of semi-gloss white on everything.  In all honesty, it could probably use another coat for good measure, but it looks fine to me so I'm not going to push the envelope!!


Please excuse the mess on the floor, but here she is all completed.  I still have to do some decorating and add a little montage to the shelf, but I'm still trying to figure out what I want up there.  It's almost like having a second mantle in the house.  SO much pressure!!!

I'm really excited about having the extra storage space though, and it seems so much more functional now than it was before.  I can't get enough organization in my life!!  We can hang our coats and hats up there, and it honestly just seems a lot more finished than it did before.  It seems more deliberate, if that makes sense.

YAY for functionality!!

Before we go, here is a quick recap of the before and after (I'm such a sucker for these):


Linking up to these awesome parties:

The DIY Showoff DIY Project Parade
Fine Crafts Guild DIY Tutorial Party
House of Grace - Twice-Owned Tuesday
Polly Want a Crafter Link Party
Blue Cricket Design Show and Tell Party 
Savvy Southern Style Boring to Better Party
All Thingz Related Anything Related Party

1.07.2011

Momentary Lapse of Sanity...

I can't believe I'm even considering this, let alone typing it for all the world to see, but I am thinking about selling the house.  *GASP*  I know, I know.  It hasn't even been a year!  It seems crazy, but I think I found my DREAM home....my FOREVER home.  The one that we could expand our family in and maybe even take care of our parents in down the road.  It is even the house that has the potential space for a design studio (which is really important to me right now, see this post for more on that).  It is just perfect....AND its only a few blocks from our current house. 

Don't get me wrong, our house is great.  And I cannot tell you how much I love the neighborhood and the people.  It's better than we ever imagined!  I just worry that we are going to grow out of it sooner than expected and I would rather pull the bandaid off quick than get even more attached to our current situation.

Ugh, this is so hard.  So, being the crazy list-loving/organizational-guru that I am, I put together a list of the pros and cons of each house.  Here goes:

Current house:

PROS
Perfect size for us now
Exactly how we want it (with all of the renovations)
AMAZING neighbors
Walking distance to elementary school
Safe neighborhood
Quiet cul-de-sac
Good price
2 working fireplaces
Full basement ready to be finished
Conservation land behind us, no building = QUIET

CONS
Will outgrow and need to add on/move in a few years anyway
Only 3 bedrooms (could be 4 if put wall in master bedroom though)
Still need to replace windows
Only 1.5 baths, no master bath
Only 1 acre (although that is really a lot of land)
Wood siding...needs to be taken care of (especially trim)

New house:

PROS
Bigger house
4 large bedrooms
2.5 baths
1.5 acres of land (really large backyard)
3 car garage (we currently have a 2-car) - and room above it for studio!!
Lots of window/natural light
Historic home (1682)
Farmer's porch in the front
French doors in most of bottom floor to separate rooms
Vinyl siding

CONS
More expensive
Have to sell current house
On Main St. (which is oddly desirable in my town, but its still a main road and not as safe as current house)
Need to update kitchen (cabinets are relatively new, but need new appliances and countertops...probably paint cabinets too)
Need to refinish floors

Ok, that didn't really help at all.  There are about the same amount of pros and cons for each house.  I don't know what to do.  I just saw this new house and something clicked.  Maybe I'm just hormonal or something.  But, either way, I guess I'm going to look into it and see what the process would be like.  I actually already contacted my real estate agent and asked what her thoughts were on listing our house.  We would probably want to list our rental property as well, but it seems crazy to do that now when the housing market is still eh.  Who knows what will happen, but I will keep you all posted!!  Wish me luck!

1.06.2011

Stylish Blogger Award


Exciting news today on the blog front (and a nice departure from the eeyore-esque post of yesterday), E over at Charm White has named me 1 of her 15 recently discovered blogs!!!  If you haven't checked out her blog before, I highly recommend heading on over.  I am really honored!  I had no idea something like this even existed, but I think it's wonderful!  To accept the award though, I need to share with all of you 7 things about myself.  So here goes nothing:

(1) I am certifiably addicted to frozen yogurt (mint chocolate chip to be exact...the white kind, if possible)...which doesn't sound that weird, but I honestly have it EVERY DAY!

(2) I have travelled to 11 different countries (some more than once) all in the last 10 years of my life

(3) If I could only watch one channel on TV, it would be HGTV....hands down.  There isn't even a close second....

(4) I have really neat penmanship.  A friend in elementary school actually wrote a letter to Microsoft with a copy of my handwriting to see if they would make it a font....haha!  No luck though.

(5) Before moving into my new house, I had never touched power tools (only hand saws and screwdrivers).  I can't believe it took me this long......I am a changed woman now.

(6) My first CD was Under the Table and Dreaming by Dave Matthews.  I thought I was soooo cool!

(7) I lived in London for a semester in college; studying at London School of Economics and working in Parliament for William Olner.  Best experience of my life!  I am still friends with him today actually.  He came to my wedding!!  And on a similar note....B surprised me with a trip to London in August 2007 to propose (since he knew it was my favorite place)  Aw...

So there you have it...a little glimpse into some random facts of my life!!  Hope you enjoyed.  And now all I have left to do is dub a few of my own awards to some stylish and fun blogs!!  This is actually harder than it looks since there are SO many great blogs out there (I even have more than 15 on my "Blogs I Love" list.) Decisions, decisions....
 
And the winners are (in no particular order):
 
Alaina at Recycled Interiors
Mary Grace at White Waxflower
RB at Roasted Beet
Kristine at Painted Hive
Brittany at Pretty Handy Girl
Kate at Centsational Girl
Layla at The Lettered Cottage
Molly at Cheap Beets
 
There are so many more out there, but I thought I would just narrow it down to a few for this purpose.  You should really go check these blogs out when you have a chance!

Thanks again E for honoring me with this award!  :)  That's it for today, but I will be back tomorrow with a DIY mudroom update to share.  

1.05.2011

One of Those Days...

This is definitely not DIY or decor-related content, it is really just a stream of consciousness....so I apologize in advance.....

Have you ever had a day that's so bad it makes you look at your life and re-evaluate some of your choices?  I have.  In fact...I am having a day like that today.  I am sitting at my desk at work (typing this instead of doing my job, which sounds bad, but its better than the alternative.....SCREAMING AT THE TOP OF MY LUNGS!!! <--oh, and the caps are to emphasize how loud the screaming would be)...and I can't stop wondering why I'm here.  Lately I feel like I am doing everything wrong (or at least that I am being blamed for everything that goes wrong) and that my best just isn't good enough around here.  I am not normally a self-loathing person....ok, maybe just a little....but in this case I feel as though it is warranted.  I'm tired of the bureaucracy, I'm tired of trying my best and getting nothing in return, and most of all, I'm just tired of pretending that this is my career.  Seriously, what am I doing here?

I started out at college as a graphic design major but after taking an elective Political Science course my first semester, I felt the spark to go to law school.  I changed my major the first day of second semester freshman year before even giving graphic design a chance.  Maybe it was a professor (Mr. Tolley, to be specific) and his down-to-earth, no-nonsense approach to teaching (and NO....nothing like that.....you guys have dirty minds....), or the idea of fighting for justice in a corrupt society, or even the idealistic notion that I could change the world.  Who knows what made me do it, but I spent the next 3 years or so pouring over legal tomes and counting down the days to law school.  It only took a semester working for a big Boston law firm to realize that maybe law school wasn't right for me though.  I continued working there for a few years in a few different departments (and met my husband there, actually), but couldn't shake the fact that I chose the wrong path.  And, of course, instead of admitting that, I just searched for alternative ways to apply my major to a different career.  Political science is definitely not useless outside of the legal world, but it is predominantly where graduates end up.  So that's where I went.  And that's where I am today.  A paralegal.  I have been in the industry for almost 7 years now and I have no idea where the time went.  How did I let it go so long?

So, to wrap up this little tangent, my point is that I feel a little lost.  This is not what I want to be doing with my life and I am the only one that can change that.  I loved graphic design back then, and I still love it now, so I think that's where I am headed.  I have always been a creative person (at least that is what the teachers always told me....which probably meant that I spent more time doodling in my notebooks than listening to their lessons...but you say tomato...) so it's worth a shot.  I am done pretending that this is what I want and I'm tired of taking the easy-way out.  And that's really what it boils down to.  I have been too lazy the last 7 years to change my life.  Maybe a little scared too, but mostly lazy.  This was easy.  I was always good at it, so I didn't have to try, but what kind of life is that?  I want to be challenged.  I want to be creative and I want to do something more with my life.  Starting today....

But I'm not quite sure where to start.  I want to buy some software and take some courses, but I should probably set up an LLC before doing either of those so that I can write them off my taxes (at least my education taught me that).....and I need to look into printing vendors and ways to advertise.....and how to create a website (other than a blog) to attract customers.  I want to design stationary; invitations, announcements, letterhead, business cards and greeting cards, etc.  Just talking about it makes me happy.  I need to start researching this and make a change in my life.  No one else is going to do it for me, right?  Anything is possible, right?  Well, I'm going to try.  I have to, or I'm just going to keep having days like these....and I don't want to look back in another 7 years and wonder what happened.

So, what are some of your dreams?  Have you ever had a day that made you realize you were following the wrong dream?  I would love to hear about it.  Any thoughts or inspiration or even recommendations would be great.  I apologize for spilling this all on you so randomly, but I thought it would be the most appropriate place to air my future plans.  Because if I say it here, then I will really follow up on it.  I feel more accountable to you (internet) than to myself sometimes...weird, right??

Well....wish me luck!  And to any of you out there that are following your dreams, good luck and congrats!  I think it is wonderful!!  Scary, but wonderful....