12.31.2010

Year in Review

As we rapidly near the end of 2010, it only seems fitting to look back on what we've accomplished over the last 12 months.  A summary of sorts.  It has been a wild ride since we bought our little casa in February, so I thought it would be fun to take a peak at all that has happened since. 

Here are some of the projects from 2010:
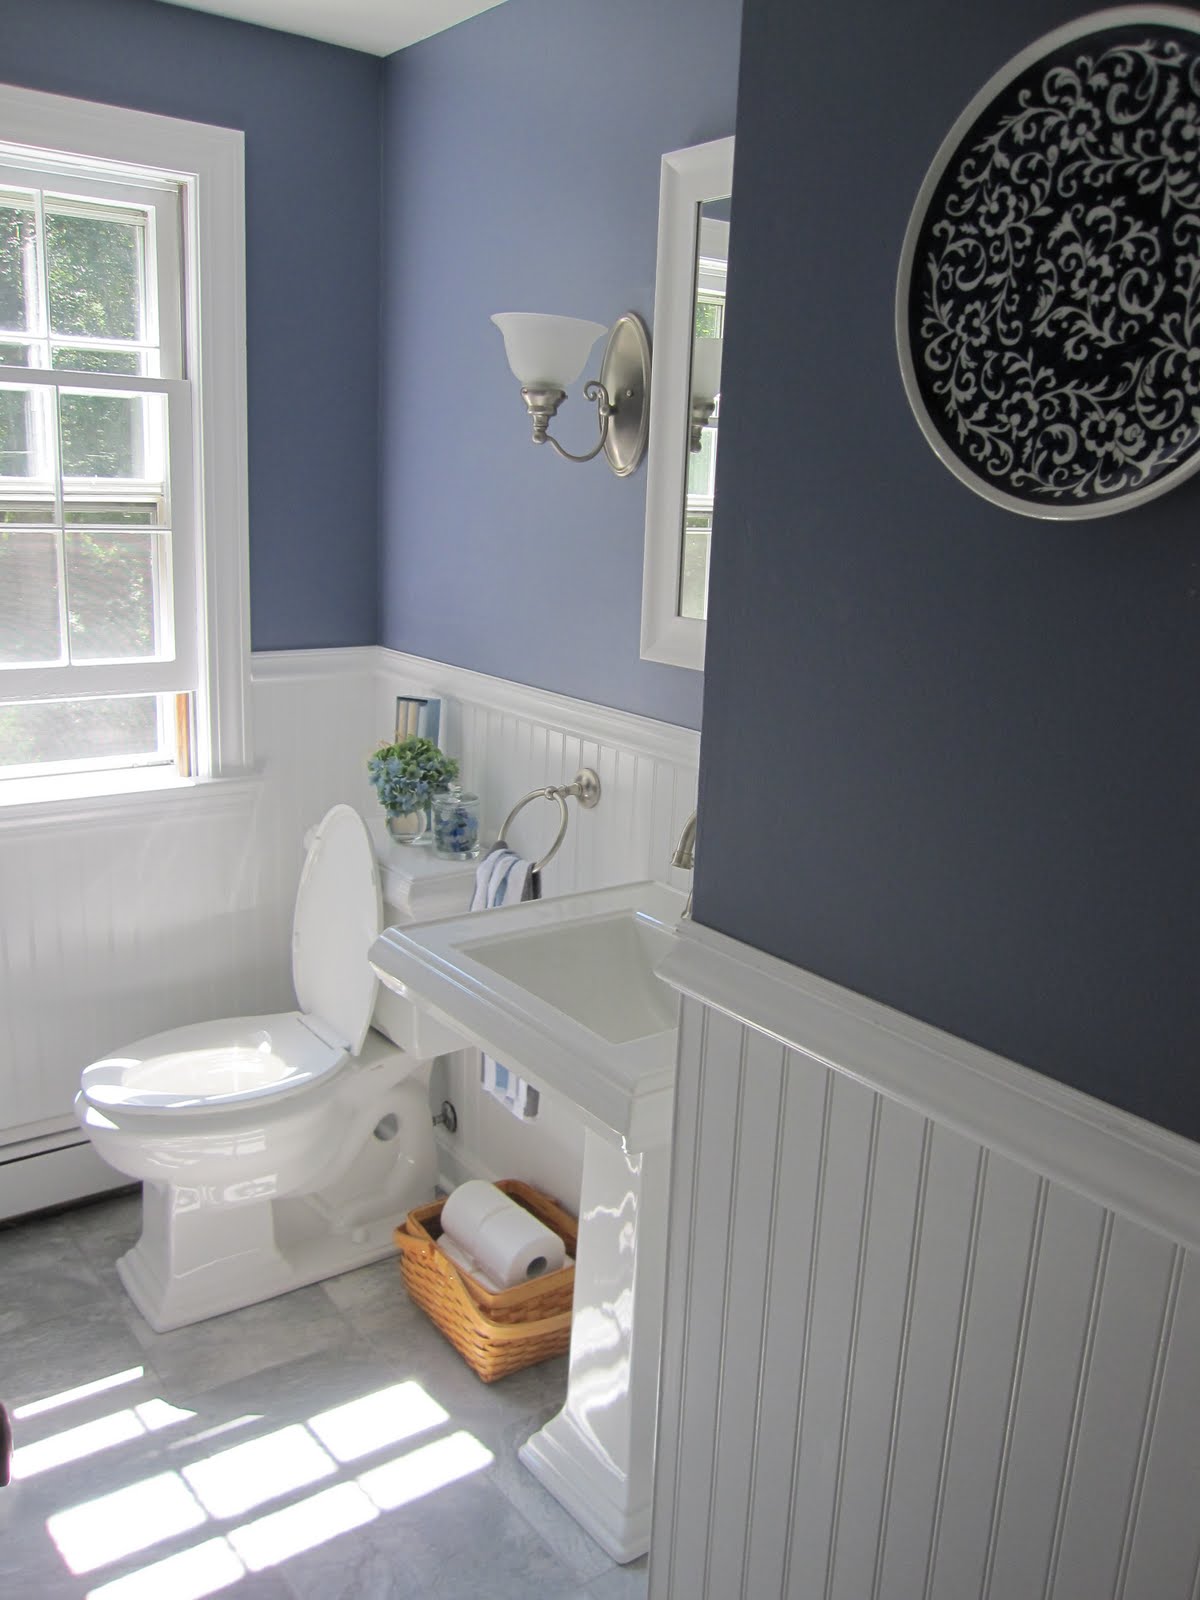
Half-Bath Makeover

(click here for more information on that project)


Kitchen Makeover
(this was by far the biggest transformation....for more
on the process, check here, here, here, here and here too!)


Dining Room Makeover
(click here for more information on that project)


Exterior Makeover
(click here, here, here, here and here for more information)


Hallway Makeover
(click here for more information on this project)


Deck Installation
(click here and here for more information on this project)


Living Room Makeover


I think that's it for the big projects of the year.  We definitely did a lot of other little projects here and there, but these were definitely the most time-consuming.  I can't tell you how happy I am to check these off of my to-do list for the year.

But just as we close out the 2010 list, it's time to put together a new one for 2011......

Here are some preliminary thoughts (I will do another post next week after I reflect a bit more on the coming year)

2011 House Projects
Re-paint office and guest bedroom
Remodel full bath upstairs
Finish basement (w/ half bath??)
Install new windows (DIY or hire?)
Paint garage doors black
Repair cracks in exterior trim pieces (re-paint)
Re-seed lawn, plant, mulch, landscape front & backyard
Finish molding and painting trim around side storm door
Clean and organize remaining boxes/items in garage/basement
Create built-in bookshelves/bench for living room
New roof for garage
Clean and repair gutters
Stain or paint deck
Find cheap patio furniture and refinish

2011 Craft/Art/Design Projects
Print maps of places lived/visited to create frame wall
Print photos for black frames in hallway
Refinish (2) craigslist side tables
Refinish (2) thrift store/hand-me-down dressers
Create vintage-looking signs for guest bedroom or future nursery
Make another coffee filter wreath for sister-in-law
Create or repurpose letters for kitchen (maybe "EAT")
Sew curtains for guest bedroom and office
Find/buy/make/distress coffee table (This is starting to inch up the priority list....I HATE our current one)


Ok, I'll stop now before I start to have a panic attack.  All of those projects are exciting and I'm looking forward to it, but its also a little overwhelming.  Many of them will not happen immediately, if at all, but at least we have something to keep us focused (and motivated since I just told you all I was going to do it) throughout the year.  Our priorities will definitely be the windows and the roof, since those are necessary for both safety and energy efficiency, but the rest can probably wait until the spring or summer.  I will definitely keep you all posted on our progress and let you know if we have added anything more to the list as the year goes on. 

For now, we are just going to enjoy the end of 2010 and get ready for another exciting new year in our home.  And although this post has gotten me thinking about all sorts of other resolutions and lists (both personal and professional), I will save those musings for another day since I have bored you enough already with this unending diatribe.  Have a happy new year and I will see you all in 2011!!!!

Oh, and before I part with you today, I just wanted to point out two new additions to the list of "Blogs I love" on my sidebar.  Please check out Roasted Beat for a witty repartee on life, great food and reality tv.  My friend RB is charming, honest, witty and a great writer to boot.  Also on the new list of faves is my friend Molly (and B's cousin's wife) who shares her passion for great food on a dime in her blog Cheap Beets!  (Kind of funny that they both use beets (or "beats") as their muse....small world)!!  But seriously, go check them both out.  They are wonderful people but also really great writers with a lot to share!

12.29.2010

Cheap DIY Wall Art


As promised, here is some cheap DIY wall art that I whipped up a few weeks ago during an especially crafty martha moment (I also made the coffee filter wreath and updated my hurricanes in the same week).  I was inspired to do this after I saw some extra fabric lying on the floor in my living room.  The colors were perfect for my dining room plus I already had some white frames lying around the house.  It took me a few days to get the initiative to tackle the project, but once I got started, it only took me about 10 minutes to have them up on the wall.

To start, I gathered the following items:

Picture frames (I had a set of 3 from Target but I only needed 2 for this purpose)
Fabric (extra scraps I had lying around) 
Scotch tape
Scissors


This really couldn't be easier.  I simply removed the existing picture from the frame, cut a piece of fabric larger than the mat opening (in this case, I chose the grayish-purple fabric for the background, which is leftover from making bench cushions for the kitchen...to be blogged about later....).  Then, I cut strips of the white fabric (which was leftover from hemming my Ikea dining room curtains) and placed them in different patterns in the frame until something looked good.  The final placement looks almost like a sail or a flag.  It is simple, but I like it.  I actually repeated the pattern in the next frame, but used more strips to change it up a little bit.  No rocket science here, just playing around until it looked decent.  Then, to secure the fabric, I just used scotch tape on each corner and sealed up the frame. 


In hindsight, I probably should have ironed the fabric before I inserted it in the frames, but I was a little too lazy for that.  Let's just say that it gives it a "rustic" feel.......


Luckily these frames already had ribbon attached to them for hanging, but if they didn't it would be easy enough to cut two pieces and tie them together in a bow at the top for some added dimension and depth on your wall. 

And finally, I had B help me measure and hang the frames on either side of the dining room windows.  I measured from the edge of the drapes to the wall (rather than from the window to the wall, since the drapes cover a few inches of the wall).

And here they are.....


It looks fairly plain, but since we have a pretty large Monet print on the left wall, I thought it would be nice to balance it out with something simple and elegant. 

Side note: now that I'm looking at the picture, it seems like they are a little too high on the wall.  What do you think???


P.S.  I'm linking up to The DIY Show-Off's 2010 DIY Recap Party, go check it out:

The DIY Show Off

12.27.2010

Snow Day


We are up to our shoulders in snow here in New England.  I think we got about 18 inches during this last snowstorm which just piled up on top of the 6 inches we had last week.  It is a regular winter wonderland!  I love it!! 

So I just wanted to say a quick hello and wish everyone a Merry Christmas!  I meant to do this a few days ago, but it just got sooo busy!  We hosted Christmas Eve, which was wonderful, but it was also a lot of work.  I tend to forget how much effort goes into hosting when I offer to do it again.  But thankfully, B was home for the day and helped out a lot.  I really don't know what I would do without him sometimes.  It sounds cheesy but we definitely make a good team.  And then Christmas day was split between each of our families.  We love seeing everyone, but its hard to travel to both places in one day.  Hopefully we will have an excuse next year to stay put and have people come to us!!  :)

I hope everyone had a great holiday though; lots of eating, drinking, loving and gift-giving!!!  And if you are in the area, have fun on your snow day!  It is perfect weather for sledding, skiing or ice skating.  I will be back tomorrow with some cheap DIY wall art to share with you. 

12.23.2010

Christmas Decor: Hurricane Transformation


Only two days left til Christmas and I am still scrambling around.  All of my shopping is done, but I have yet to wrap ANYTHING and still need to buy some grocery items for Christmas Eve dinner.  We are hosting this year in the new house, and it is really exciting!!  And to break from tradition a bit, we are going to serve an italian-style meal; sausage lasagna (my sister-in-law's yummy recipe), caesar salad, homemade garlic bread and some "Doggy Treats" as an appetizer.  They are also called Sausage & Hamburger Rounds or something like that, but I think Doggy Treats is a little more fun!! 

Here is the recipe if anyone wants to try it:

Doggy Treats

1 lb hot sausage (casing removed)
1 lb lean hamburger
1 lb velveeta cheese (cubed)
1/4 tsp oregano
1/4 tsp salt
1 shake worchestershire sauce
2 loaves miniature party rye rounds

Brown and crumble sausage and hamburger.  Add cheese and seasoning to the mixture then spread onto individual rye rounds.  At this point, you can either freeze them (and then put them into plastic bags for storage until needed) or you can pop them on a pan and put under the broiler for a few minutes.  EASY-PEASY!!!  I am only having 7 people over tomorrow night, so I will probably halve the recipe or just freeze the ones I don't use.  I think everyone will love it.  Wish me luck!!

And, as promised in my mantle post earlier this week, here is a quick before and after on my christmas-y hurricane vases. 

Materials:
(2) hurricane vases
(2) tall candles (any color is fine - green just worked well in my room...AND I already owned them)
White cane sugar (about a bag and a half)
Burlap Garland (bought a roll Michael's with a coupon for $1.50)
Roll of Ribbon (I chose a sparkly green one from Michael's....on sale and w/ coupon $1.25)
White snowflakes ($1 for a pack of 4 at the dollar store)
TOTAL: $3.75

I started out with two glass hurricane vases.  For most of the year, they are filled with some sand, a candle and some shells or starfish.  For Christmas, though, I decided to take it up a notch.  I poured out the sand and added some white sugar to the bottom of both. 


Then I added my tall green candles (can't remember where I got these from but I have used them for years and they are still ridiculously tall!!)  And next step was to heat up the hot glue gun and get ready to add the burlap garland.  On the roll, it is rather wide, so I actually cut the length I needed and then folded it over to double it.  I wrapped it around the hurricane, dabbed a few dots of hot glue on either side of the cut ends and held them together for a minute to cool. 


And while the the glue gun was hot, I cut the ribbon to the same length and dabbed a few dots to attach it around the hurricane as well.  By gluing both the garland and the ribbon to itself, I will be able to take off this decor after the holidays and change up the look of the hurricanes for another season.


And finally, the last step was to add the snowflakes.  Originally I was just going to use these snowflakes on the tree as ornaments, but once I started this hurricane project, I knew they would go to better use here.  All I did to attach them was add a dollop of glue to the center of it and hold it in place on the ribbon.


And..................VOILA!


It was such a cheap and easy transformation that I had to share it with you guys!  And I can always use it again next year if I keep the same rustic, natural theme in my living room.  All I would have to do it slip it off and store it with the rest of my christmas decor and then slide it back on next year!! 

Have any of you done some fun christmas crafts?  Any easy, affordable ones you would like to share too??? I would love to hear about all of them! 


12.20.2010

Christmas Decor: Mantle

Not only is this my first year decorating an entire house for christmas, but it is also my first time creating a festive mantle-scape.  YAY!  I have actually never had a fireplace in any home I've lived in.  I have had some shelves that doubled as mantles in our living room, but never the REAL thing [gasp].  Growing up, we would always hang the stockings on the wall behind the TV in the basement or even keep them hidden since they were stuffed so full they would have taken the wall down with them.  It was perfect, and I have the most wonderful childhood christmas memories....but I never knew how much I wanted a christmas mantle until I actually had one!  For most of the year our mantle looks like this (with a few variations here and there for the seasons)


But for the upcoming holiday, I decided to take it up a notch and add a few festive additions to the mix.  Here she is today:


All I really added were some hurricanes (which I updated for about $5 and will post more about tomorrow), white berry garland (about $3 for three strands...also used on the tree at JoAnn Fabrics), some stockings from Crate and Barrel (the Angelique collection....currently unavailable online...but some stores still have them), a few mercury glass votives from Target (clearance) and VOILA!!  Really easy update.  I had a few other items that I wanted to add....some burlap flowing underneath everything and a few strands of crystal beads...but it was too much.  Our goal this year was a simple, rustic, elegant theme and the extras just put it over the top.  Also....I'm pretty sure that burlap is REALLY flammable, so I thought that including it within close proximity to the roaring fire would be less-than-responsible.  We rarely have sparks fly out of the fireplace, especially with the screen, but you can never be too careful!!!


So that's it for our mantle.  Since its my first year, it's definitely not something extraordinary, but I will work my way up to that.  I am starting small this time around and will learn more as I go.  I really do love having a mantle though and I am so thankful that we didn't give up the fireplace on our list of must-haves while we were house-hunting! 

Also, I missed linking up to some of the earlier christmas-decor and mantle-related linky parties, so I will just have to wait for next year.  But if you haven't checked them out already, there are quite a few great mantles to be seen at Layla's party over at The Lettered Cottage.  Check them all out!

12.15.2010

Coffee Filter Wreath


After being inspired by several other bloggers out there like Nester, The Little Brown House, and The Pleasures of HomeMaking, I set out to create one of my own coffee filter wreaths.  How hard could it be, right?  It didn't seem difficult from what I read in blogland and based on the photos I've seen they look amazing......so why not?  Well...I'm going to be honest with you.  It IS beautiful and I DO love it, but it was a little bit of a PAIN in the @$$ to do.  Although there is nothing difficult about the process, it is very time consuming!  My husband even threatened to pry the glue gun from my hands when he found me still working at 1:00 am last week.  All in all, it took me about 6 hours to finish over the course of a few nights.  It really wasn't bad,  though, I just like to exaggerate and complian.  Or so my husband says.  Haha.

But, the most important part is that it was totally worth it.  I love it.

And the best part is that no one can tell that it's made out of coffee filters!  A few people at my party this weekend were shocked when I told them how I made it!  Some even asked me to make one for them since it sounded like it was pretty easy to do.  Ha...maybe if you hire me a full-time masseuse or trade me your first born child...but otherwise, no can do....

So....if I haven't deterred you with my ranting and you are still eager to make your own coffee filter wreath, here is a little how-to on the process.

Supplies:

Package of white (or brown) coffee filters (I used the larger-sized ones) - approx 200
Glue Gun
20 glue sticks (at least that is what I used)
1 Foam Wreath form


I started by separating out the individual coffee filters and pinching then at the bottom to make an almost flower-like shape.  See below....


Then I put a dollop of hot glue on the form (and occasionally right on the coffee filter) and held it in place for a few seconds.  I found that the best method was to create an almost flat bottom to the "flower-shaped" coffee filter before attaching it to the wreath to achieve the most secure outcome.  Every once in a while I would have to add a little more hot glue to the bottom to make sure it was going to stay in place.  Here is what my wreath looked like after a few coffee filters were attached. 


And then I just kept attaching them one by one next to each other until I achieved this..... 


I fully admit that I wanted to scream and throw my glue gun out the window about halfway through, but just keep pushing through and you will be so happy. It is totally worth it in the end and you will thank me. Well, actually, you will probably just thank yourself, but you know what I mean. Just keep glueing, just keep glueing.....


You can't tell in the photo, but I did not glue any coffee filters on the back.  By that point I just couldn't hot glue another thing.  And to be honest, it hangs more flat this way.  I made sure to do enough around the edges of the wreath so that you couldn't see the foam wreath form in the back when it was hung though.  I would definitely recommend that.

And last, but not least, I hung it using a piece of ribbon that I so imaginatively hot-glued to the back of the foam wreath form and hung over my built-in hutch with a thumb tack.  So easy!!!  Aside from taking a while to hot glue all of the coffee filters, this project is REALLY easy and REALLY affordable.  I totally recommend it.  I will absolutely use this in my house long after the holidays are over.  I might just put a different ribbon and hang it somewhere new to keep people guessing.  I love having versatile items that can accommodate any and all of my design whims (as they seem to change so frequently).  But when they are as cheap as this was (I think $5 total with some Michael's 50% off coupons and coffee filters that I stole from work already had) it is crazy not too!  I have even seen people making rectangular wreaths or trees out of coffee filters too.  There are unlimited possibilities with this seemingly underappreciated household item. 

So that's it for my wreath tutorial.  Have any of you made one of these before?  If not, has this inspired you to make one for yourself or hire a masseuse for me to make one for you instead?  I would love to see or hear all about it if you did!! 

Happy Glueing!!

12.14.2010

Christmas Decor: Tree


Ever since I was a little girl, I've LOVED decorating the christmas tree.  It was always one of those events that really inaugurated the holiday season for me.  And I still feel that way today.  There is just something magical about filling your home with a seasonal smell, crisp white lights and all of your favorite keepsake ornaments.  I don't know about you, but it just makes me feel all warm and cozy inside. 

And this year was no different.  We moved at the end of December last year and really didn't have a chance to decorate or celebrate in our old place.  There was actually more taking down than putting up the whole month, so it felt like we didn't even celebrate at all.  To fill the void, I even drove up to decorate at my parents house.  I had to.  It felt like I was having withdrawals....

But enough about last year.  This year makes up for all of it since we are in the new house and in a new town....it is all really exciting!!  We had our annual christmas party (well annual except for 2009) this past Saturday and what would a christmas party be without a tree.  So, I went out last week (I think it was Wednesday...whichever was the COLDEST day of the year!!!!) and scoured a few different local nurseries for the "perfect" tree.  And when I say a few, I mean 5.....crazy, I know.  There were hundreds of beautiful trees; balsams, spruces and firs...you name it.  But I needed to find the "one"!

So after turning down an ALMOST perfect one at the fourth nursery, I decided to try one more place.  And I'm so glad I did.  The sales guy was super nice and patient (although he was probably both ONLY because he works on commission), but nevertheless he spent a good 30 minutes going back and forth between three trees until we finally narrowed it down.  Bless his heart.  He kept picking them up and spinning them around....all with a smile on his face.  I'm pretty sure there is a special place reserved for him in heaven.  If it had been B with me, he probably would have told me to just walk around the tree a few times....

I waited a few days after bringing her home to decorate....


My theme this year, if you can even call it a theme, was burlap and white.  I was going for a rustic, natural, almost ethereal look.  I used burlap as a tree skirt (no sewing necessary), some old ornaments that I already had (white balls, icicles, snowflakes and others we have collected over the years)....and a few new ones too!  In the old house, we had mostly warm colors on the walls, so I used a lot of gold, maroon and white in my christmas decor.  With the new color scheme, I thought that white, silver and crystal would be more appropriate.  Luckily, my tastes have changed so much over the years that I have a slew of ornaments to suit most of my decorating whims.  And it's fun to change it up every year or so....it keep things interesting. 


What is your tree theme this year?? 


I will be back tomorrow with my mantle and other christmas decorating.  For now, I'm linking up to these parties....go check them out!!!