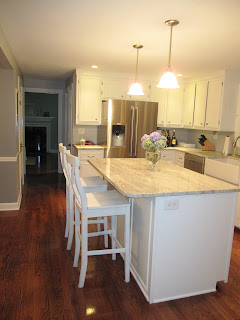
So without further ado, here is a quick recap of the full kitchen transformation:
February: Here is what our kitchen looked like on move-in day. Purdy, huh?
March/April: It wasn't long before we were tearing out the floor, ripping out the faux ceiling beams, pulling up countertops, and knocking down walls (between the kitchen and dining room). We also removed all of the cabinet doors in anticipation of painting (which we decided to do after weeks of pricing out brand-new cabinets at several different stores.....but ultimately, we didn't want to give up perfectly good all-wood cabinets if we didn't have to). In lieu of spending $10,000+ on cabinets, we splurged and spent $1,500 to have someone come and professionally paint the cabinets (since they were pine and I was worried that the white wouldn't cover well). Best decision I ever made. Yes, I could have done it myself, but it saved me SO MUCH time.
Note: the painting package didn't include the INSIDE of the cabinets, so I decided to paint them myself since I didn't want to see the yellow walls every time I opened up a cabinet.
May/June: It was already looking SO much better, but we still had a long way to go. We decided to install recessed lighting since our ultimate goal was to brighten up the space. We brought in an electrician for this job, but it was pretty inexpensive considering we installed a total of 7 recessed lights, had them re-wire the lighting over the future island for two pendants and put in place wiring for undercabinet lighting (which we still haven't done yet....oops). I can't remember the total cost of this update, but I remember it being very reasonable. Also, during this time, B (and our dads) built the island. I included some of the during shots, but I should really have B do a separate post on how he did this exactly. I was honestly gone for a few hours that day and when I came back it was done. TA-DA! We also decided to have some cabinets built along the entry way wall for extra storage and a future mudroom. In hindsight, I would have definitely had B install them rather than paying a carpenter to do it, but ultimately we wanted to make sure they they would be able to hold a lot of pantry items since we are big Costco people!! Better safe than sorry!
May/June cont'd: Another big project during this time was to build a sink base that could accomodate a 300 lb. farm sink (YAY)!! I definitely need to have B do a post on how to build one of these, since we googled it for quite some time and couldn't really find any awe-inspiring tutorials. Most people probably buy new cabinets when they are doing this sort of renovation which already come equipped to handle the weight of a huge sink, but ours certainly didn't. B pretty much took the whole cabinet apart and started from scratch. See the photos below for a quick step-by-step on the process (and click here for more information on choosing a farm sink).
July/August: 5 months into this project and we still don't have a working sink, actual floors, or a stove....but we are getting there!!! Our next step is to cut a whole in the side of the house and install a slider.
July/August cont'd: As you can see in the photos above, we had to bring our new fridge into the house through the rough opening in the wall. It wouldn't fit through any of the other doors, so this was the only way in.....even with the doors off!! This baby is never leaving!! And you can also see in the photos above that the painting process had begun and our cabinets were transforming before our very eyes!! Once the painting was finished, everything seemed to fall into place. The granite was installed the next day and the floors came in a few days after that. Things were really starting to move along (see here for more details)....
July/August cont'd: And as soon as the floors were dry, we installed the appliances and light fixtures. It was a FUNCTIONING KITCHEN!!! YAY!
August/September: Our next steps were to add the cabinet knobs and handles, paint the walls, and install the vent hood...
October/November: This probably could have been done a lot sooner, but as soon as the kitchen was functioning I lost all motivation to tile the backsplash. It was just such a daunting task for me that I waited and waited until it was almost too cold to use the wet saw outside. On one nice weekend, I tackled it (see here and here for more details).....
December: After all was said and done, there was still one lingering project that I wanted to complete. So on one Saturday morning, I decided to buy some materials to finish up the mudroom. I brought them home and begged B to install it. Without expecting him to jump right on it, I ran out for a few more errands and came back to this.....
YAY!! The kitchen was officially done. 8 months later, but EXACTLY the way we wanted it (and in the price range we wanted as well)!!! If I had to do it over, I wouldn't change a thing.....well, except for maybe choosing to get pizza most nights rather than salads when we were ordering takeout. Ugh....maybe we worked off the extra pounds with all the work we did though....haha.
So there you have it, a full recap of the biggest transformation in our new house. And just to satisfy some before and after cravings, I will throw some in before I go. Enjoy!!
So what do you think? Have any of you done a big kitchen renovation as well and lived to tell the tale? I would love to see or hear all about it. Any thoughts, advice or wisdom to those considering a kitchen renovation would also be wonderful!!
Oh, and I'm linking up to these parties:
DIY Showoff DIY Project Parade
Remodelaholic Anonymous 55 Blog Link
Thrifty Decor Chick's March Before and After Party
Element Interiors Whassup Wednesday Party
Remodelaholic Anonymous 55 Blog Link
Thrifty Decor Chick's March Before and After Party
Element Interiors Whassup Wednesday Party


